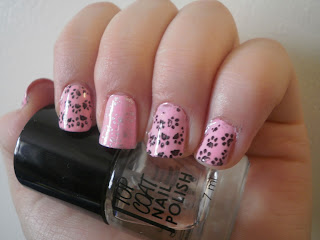
In this manicure I use the Cheeky 'Wild at Heart' plate, which comes with a number of designs, both full nail and little icons, that center around animals. The official cheeky site for this product is as follows; http://www.cheeky-beauty.com/cheeky-new-2013-collection-of-jumbo-nailart-polish-stamp-stamping-manicure-image-plates-accessories-set-kit-nail-art-jumbo-image-plate-9-wild-at-heart/. But I believe the product can also be purchased through amazon.
Now to tell all of you how I used the plate. It is a fairly regular use of them but I know many have never used a stamping plate and so I will just go through the steps for any of you who are new to it.
First of all I painted my nails with a pale pink color, a color that would allow the black polish to really stand out. I had hoped to also do a silver nail but this, as you can see from the picture, did not work out so well. Try and paint this coat neatly as there will be less clean up later.
 |
| Jack Wills Polish |
After the base polish has dried chose the stamping design you want to use and clean with a bit of nail polish remover before use.
 |
| Cheeky - Wild at Heart Plate |
The next step is to take the scrapper and scrap along the design to level out the polish so it is only in the wells of the design. This may take a couple of attempts and does need to be done quickly to avoid the polish drying out.
Now you take the stamp and press onto the design transferring the polish to the rubber stamp. Press firmly and all around to ensure you get the maximum you can.
Now your stamper is loaded with the design you choose where on the nail you want it and press the rubber onto the nail to transfer the nail design. Sometime the nail polish will not transfer from the rubber as it has dried out too quickly, simply wipe the stamper and nail plate clean with nail polish remover and try again.
As you can see the design will also stick to your skin when is it transferred and so be sure to have out some cotton wool buds to clean of the excess.
Once cleaned add a top coat and you are done. Always remember to clean the nail plate, scraper and stamper too to ensure dry polish doesn't build up on them.


No comments:
Post a Comment